

Import Leads from a CSV into FoxReach (1 min)
Before you start
You need a CSV with one row per contact and a header row on top. The only column FoxReach insists on is an email column. Everything else is optional. A good file looks like the one used in the video,q3-outbound-leads.csv:
- A header row. The first line must be column names, not the first contact. FoxReach reads these headers to map your columns.
- Recognizable headers. Names like
email,first_name,company, orJob Titlemap to lead fields automatically. Unusual headers still import, but you will map them by hand. - UTF-8 encoding. In Excel, choose the CSV UTF-8 option in Save As so accented names survive; Microsoft’s save a workbook to CSV page shows where. Google Sheets exports UTF-8 by default via File, Download, Comma Separated Values (download a file).
.csv extension and must be 10 MB or smaller. FoxReach detects the delimiter from the first line, so comma, semicolon, tab, and pipe-separated files all work. Values that contain commas should be wrapped in double quotes, as RFC 4180 describes and every spreadsheet does on export.
Moving from another tool? The Instantly migration guide covers exporting lists in a shape FoxReach reads.
Step 1: Open the import wizard
Click Leads in the sidebar. The Leads page lists every contact as a table with Contact, Company, Title, Status, and Tags columns, a count of total contacts under the heading, and a toolbar with search and filters. The icon next to each email shows its verification state.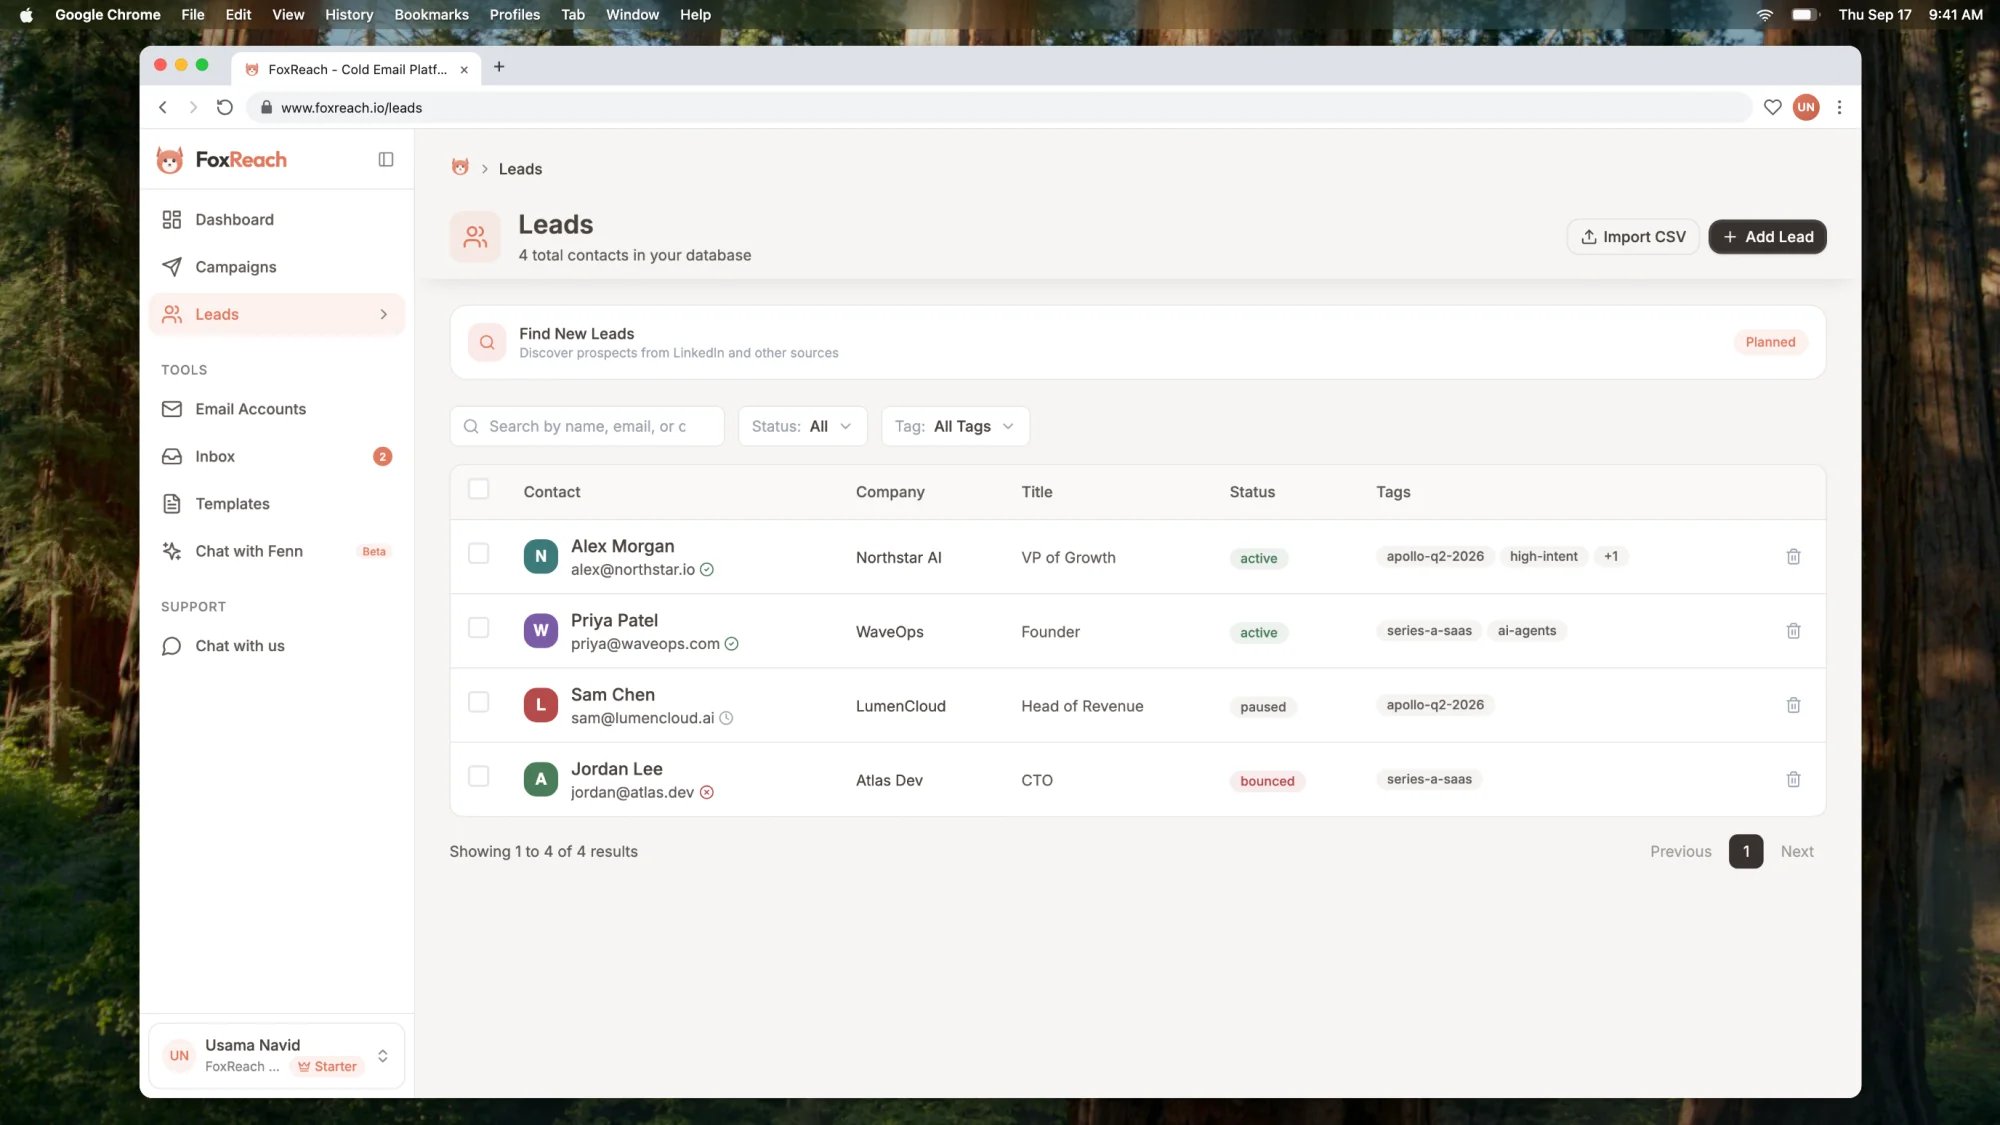
The FoxReach Leads page showing the contact table with tags, verification icons, and the search and filter toolbar
Step 2: Upload the CSV
The first step is a drop zone that reads “Drop your CSV file here or click to browse”. Drag the file onto it, or click to open your file picker. Only.csv files are accepted.
FoxReach reads the file, counts the rows, and moves you to the mapping step. The file name and a “rows found” count appear at the top so you can confirm you uploaded the right list.
Step 3: Check the column mapping
This is the step that matters. FoxReach reads your headers and suggests a mapping to its eight lead fields: Email (required), First Name, Last Name, Company, Job Title, Phone, LinkedIn URL, and Website. Each field has a dropdown listing your CSV headers, with ”— Select column —” as the empty option, and a green check next to every field that has a column assigned. For the sample file, Email, First Name, Last Name, Company, Title, and LinkedIn URL map on their own.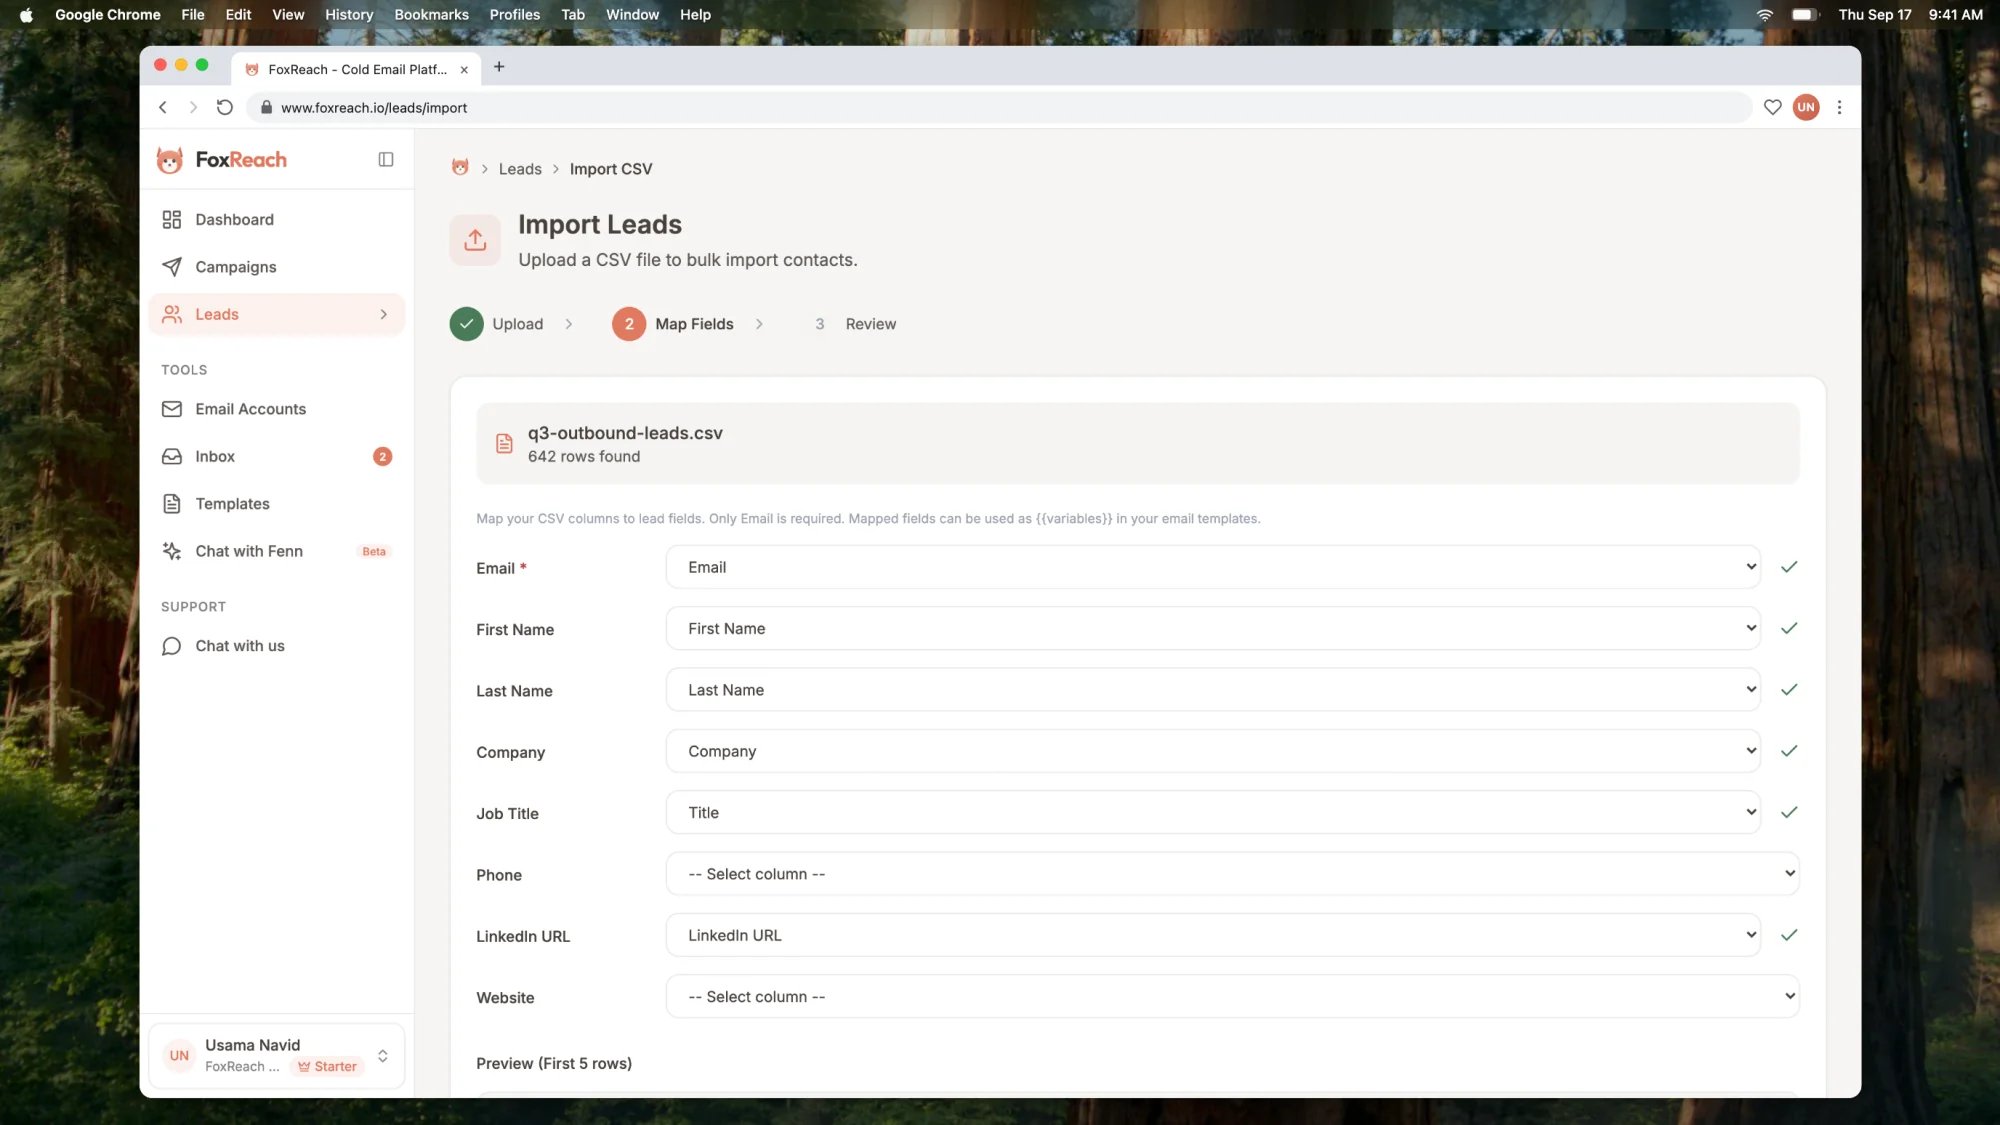
The Import Leads wizard after uploading a CSV, with the auto-mapped columns and the five-row preview table
Signal (“Hiring SDR Manager”, “Raised Series A”) has no matching lead field, so it is kept as a custom field named Signal on every lead. Custom fields work as template variables, so {{Signal}} in an email is filled per lead.
Step 4: Tag the batch
Further down is Tag Imported Leads. FoxReach fills it in with the file name minus its extension, so uploadingq3-outbound-leads.csv tags every lead in the import with q3-outbound-leads.
Add your own by typing in the box that reads “Type a tag and press Enter…” and pressing Enter, or clicking Add. Tags you have used before appear under “Existing tags:” as one-click chips. In the video the import gets a second tag, vp-growth.
One tag for the source (apollo-q2-2026) and one for the segment (high-intent) makes it easy to pull the right leads into a campaign later.
Step 5: Decide whether to verify emails
On paid plans, the last card is Verify Emails After Import, with a toggle. The text under it explains the trade: leads import instantly, verification runs in the background, and bad emails are blocked from campaigns. Turn it on and FoxReach shows how many credits the import will use (one per row) and your balance. Paid plans include 1,000 credits a month; if the balance is short, the wizard links to billing with “Purchase more”. Switch it on for any list you did not build yourself; a bounce costs sender reputation. The email verification guide explains each result.Step 6: Run the import and read the summary
At the bottom, click Import N Leads, where N is the row count. With verification on, the button reads Verify & Import N Leads. FoxReach parses the file right away, checking each email and finding duplicates, then loads the rows in the background. The Review step shows an Importing Leads… panel with a progress bar and a running “x / y leads” count. When the job finishes, the heading changes to Import Complete. If verification is on, a second panel, Verifying Emails…, follows and reports how many addresses came back Valid, Unverifiable, Bad, or with Errors. The summary at the top has three numbers:- Imported. New leads created. If any rows matched leads you had deleted earlier, a line underneath shows how many were restored from trash.
- Duplicates Skipped. Emails that already exist as active leads in this workspace, listed under Duplicate Emails.
- Errors. Rows that could not be imported, usually a missing or malformed email, each listed with its reason under Error Details.
What happens after the import
Duplicates are checked against active leads only. An email already in the workspace is skipped. The same email twice in one file is imported once. An email belonging to a lead you deleted restores the old record and merges its fields with the new row, so its campaign and reply history comes back. That is what “restored from trash” means. Unmapped columns are custom fields. Every non-empty column you did not map lands on the lead as a custom field keyed by the header text. They show up in the Custom Fields card on each lead, in the variable picker when you write a template, and as columns when you export. Tags apply to every lead in the batch, including restored ones. On the Leads page the Tag filter narrows to one tag, and the chips on each row show the rest. Verification status is per lead. Each verified lead carries a status of good, unverifiable, bad, or error, shown as the icon next to the email in the list and in the Email Verification card on the lead page. Bad leads stay in your database but are never sent to. The leads are ready for a campaign. On the Leads page, use the search box (“Search by name, email, or company…”) or the Tag filter to find the batch, select the rows, and choose Add to Campaign from the toolbar. Pick the campaign in the dialog and the leads are attached. The campaign guide shows how custom fields become sequence variables. Connect at least one inbox first; the connect an email account guide covers that.Organizing leads after import
Tags. Select rows and click Tag in the toolbar to add tags in bulk, or open a lead and use the Tags card, which has an “Add a tag…” box and a Quick add row of your existing tags. Custom fields. Open any lead to see its Custom Fields card. Click Add field, type a name and a value, and save. This is where you would add atechStack or signal field by hand for a lead that came in without one; it becomes a template variable immediately.
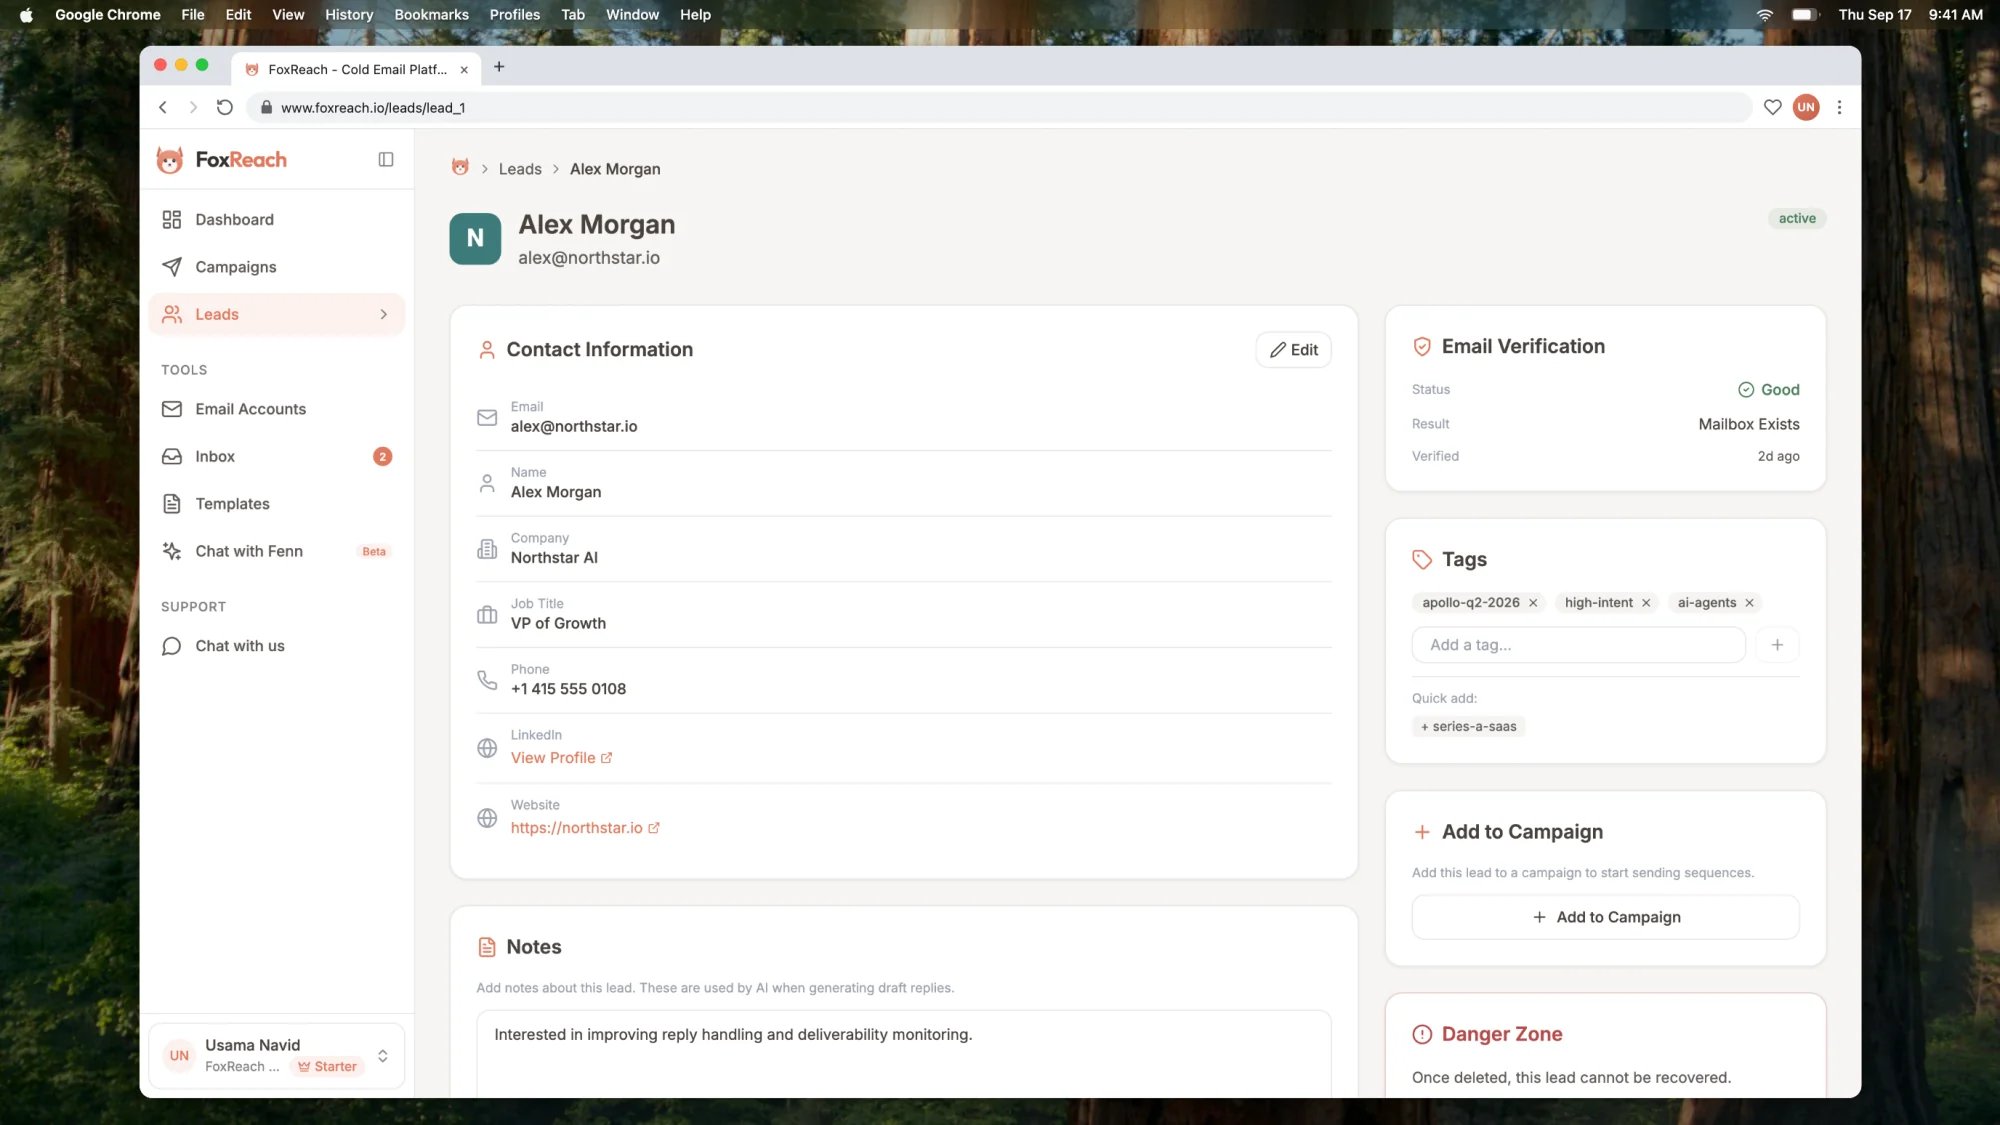
The lead page for Alex Morgan at Northstar AI, showing contact fields, custom fields, tags, and the activity timeline
leads.csv of your workspace with custom fields flattened into their own columns, so a round trip out and back in is lossless.
Adding a single lead by hand
For one-off contacts, Add Lead next to Import CSV opens the Add New Lead form. Email Address is the only required field; the other seven are optional. Below the fields sit an Add to Campaign (optional) dropdown, defaulting to “No campaign”, and a Verify email before adding checkbox on paid plans. Click Create Lead (or Verify & Create Lead when the box is ticked).Importing through the API
If leads come from a CRM, a scraper, or an agent rather than a spreadsheet, skip the wizard. The public API has a bulk endpoint,POST /api/v1/leads/import, that takes up to 1,000 leads per request as JSON, deduplicates them the same way the wizard does, restores soft-deleted matches by default, and returns created, restored, duplicates, and errors counts in one response. It authenticates with a workspace API key. The API keys and webhooks guide shows how to create one, and the integrations page lists the CLI, Python SDK, and MCP server that wrap the same endpoint.
Contact limits by plan
Each plan caps the contacts a workspace can hold, and the import checks the cap before writing anything. If the file would push you over, the import is refused with a message naming the limit. Restored leads do not count as new.
The pricing page has the full comparison, including lifetime tiers from 3,000 contacts on Solo to 500,000 on Enterprise.
Troubleshooting
The mapping step cannot find my email column. FoxReach strips the invisible byte-order mark Excel sometimes adds, but a header likeE-mail address or Contact will not auto-map. Pick the column from the Email dropdown, or rename the header to email and re-upload.
Names show up as garbled characters. The file was not saved as UTF-8. Re-export with the CSV UTF-8 option in Excel, or download again from Google Sheets, then use Import More. Duplicates from the first attempt are skipped, so the re-run is safe.
All the rows show as duplicates. The emails are already active in the workspace. To replace them with fresh data, delete the existing leads first. To only add new tags, select the existing leads on the Leads page and use the Tag action instead.
The file is rejected as too large. The limit is 10 MB. Split the spreadsheet into two files under the limit and import each; the second import skips anything the first created.
The progress bar stopped. If an import makes no progress for ten minutes the page says so and stops polling. Rows imported so far are saved; re-upload the same file and the duplicates check picks up where it left off.
Next step
Your leads are in. Verify the emails if you skipped it during import, then create a cold email campaign and add the tagged batch to it. New to the product? The getting started guide ties the pieces together, and the pricing page shows how many contacts each plan holds.Frequently asked questions
What columns does my CSV need to import leads into FoxReach?
What columns does my CSV need to import leads into FoxReach?
Only an email column is required. First name, last name, company, job title, phone, LinkedIn URL, and website are recognized automatically when the header names are close to the standard ones. Any other column is kept as a custom field on each lead, and custom fields can be used as personalization variables in your templates.
What happens to duplicate emails when I import a CSV?
What happens to duplicate emails when I import a CSV?
FoxReach checks every email against the leads already active in your workspace and against the rest of the file. An email that already exists is skipped and listed under Duplicates Skipped. A repeated email inside the same file is imported once. If a matching lead was deleted earlier, the import restores it instead of creating a second record.
How large a CSV can I import into FoxReach?
How large a CSV can I import into FoxReach?
The import wizard accepts CSV files up to 10 MB. Rows are loaded in the background in chunks, with a live progress bar, so a large file does not block the page. The number of contacts you can hold is set by your plan: 200 on Free, 5,000 on Starter, 50,000 on Growth, and 200,000 on Agency.
Can I verify emails while importing them?
Can I verify emails while importing them?
Yes, on paid plans. Turn on Verify Emails After Import before you click the import button. The leads import right away, then a verification job runs in the background and marks each address as valid, unverifiable, or bad. Bad addresses are blocked from campaigns. Verification uses one credit per email, and paid plans include 1,000 credits every month.
Is there an API for importing leads into FoxReach?
Is there an API for importing leads into FoxReach?
Yes. The public API has a bulk import endpoint that accepts up to 1,000 leads per request as JSON, deduplicates them against your workspace, and returns counts of created, restored, duplicate, and errored rows in a single response. It uses a workspace API key, so it works from scripts, n8n, or any agent that can make an HTTP request.