

Verify Emails Before You Send in FoxReach (1 min)
Why bounces cost more than one lost email
A bounce is a signal, not just a missed opportunity. Mailbox providers watch how many of your messages come back undeliverable, and a sender that keeps hitting dead addresses looks like one that scraped a list. Google’s Email sender guidelines tell bulk senders to keep their spam rate below 0.10 percent and never let it reach 0.30 percent, and ask you to keep lists clean of addresses that do not exist. Bounces, complaints, and low engagement feed the same reputation, and once it drops, even good emails land in spam. A check costs one credit and a couple of seconds; a damaged domain takes weeks of warmup to recover. The opinion piece on email verification for cold email makes the full argument. This post is the how.Step 1: Read the status icons on the Leads page
Open Leads in the sidebar. Under each contact’s name, next to their email address, there is a small icon that tells you whether that address has been checked and what the answer was.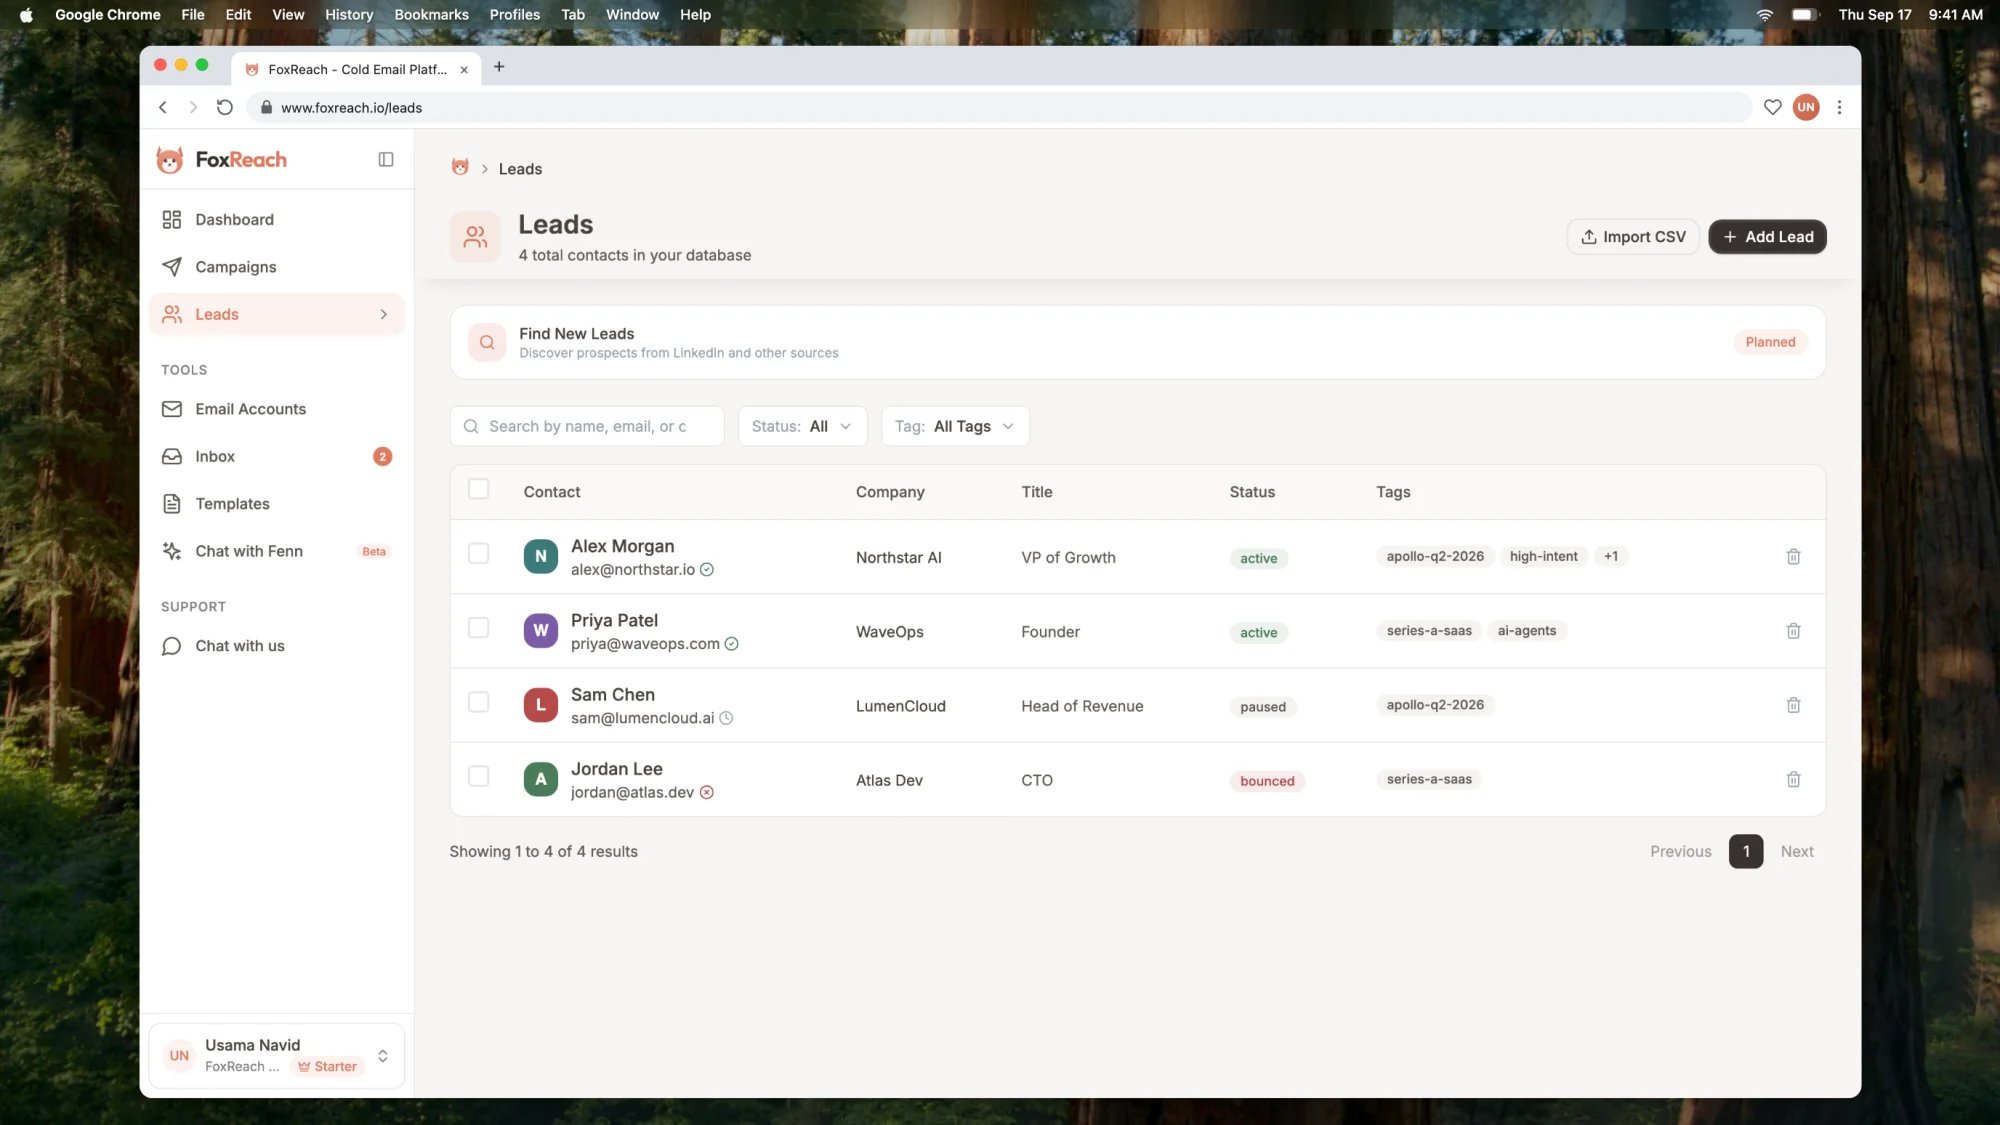
The FoxReach Leads list showing the verification status icon next to each email address
Step 2: Verify one lead as you add it
For a single contact, verify at the moment you create it. On the Leads page click Add Lead. Fill in the Email Address field and whatever else you know, then tick Verify email before adding at the bottom of the form. The label next to the checkbox shows how many credits you have available, and the button changes from Create Lead to Verify & Create Lead. Click it and FoxReach checks the address first. If the mailbox exists, the lead is created with a green check already in place. If the address comes back bad, the lead is not created, you see an error explaining why, and no credit is charged.Step 3: Verify a selection from the Leads list
This is the flow in the video. Back on the Leads page, tick the checkbox on the left of each lead you want to check; in the demo, Sam Chen and Jordan Lee are the two that have not been checked yet. As soon as one row is selected, a bulk toolbar appears with Tag, Verify, Add to Campaign, Export, and Delete.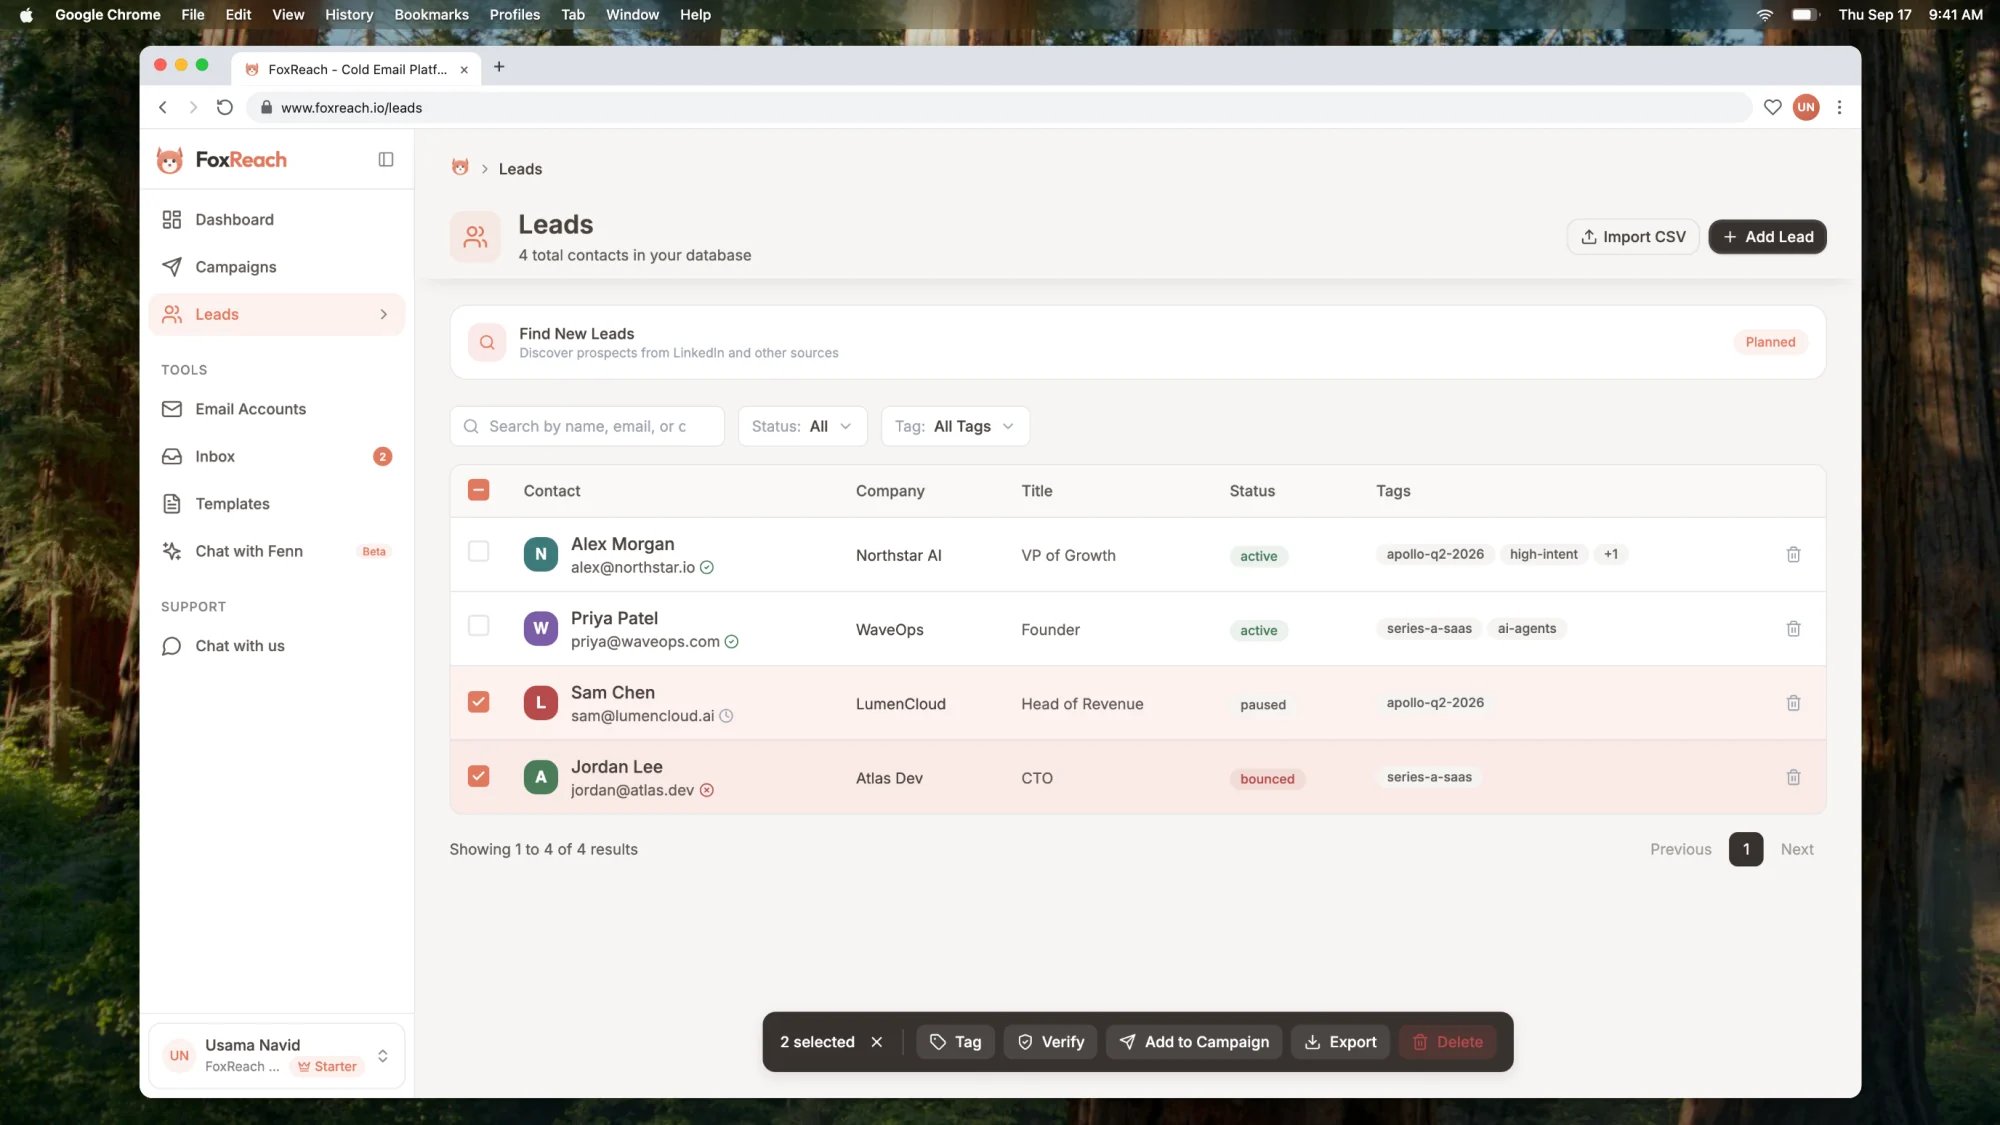
Two unverified leads selected on the Leads page with the Verify button showing in the bulk toolbar
Step 4: Verify a whole file during import
When the list arrives as a CSV, verify it on the way in. Click Import CSV on the Leads page to open the Import Leads wizard, which runs through Upload, Map Fields, and Review. Drop your file on the Upload stage, and on the Map Fields stage, below the column mapping and the optional tags, switch on the card titled Verify Emails After Import.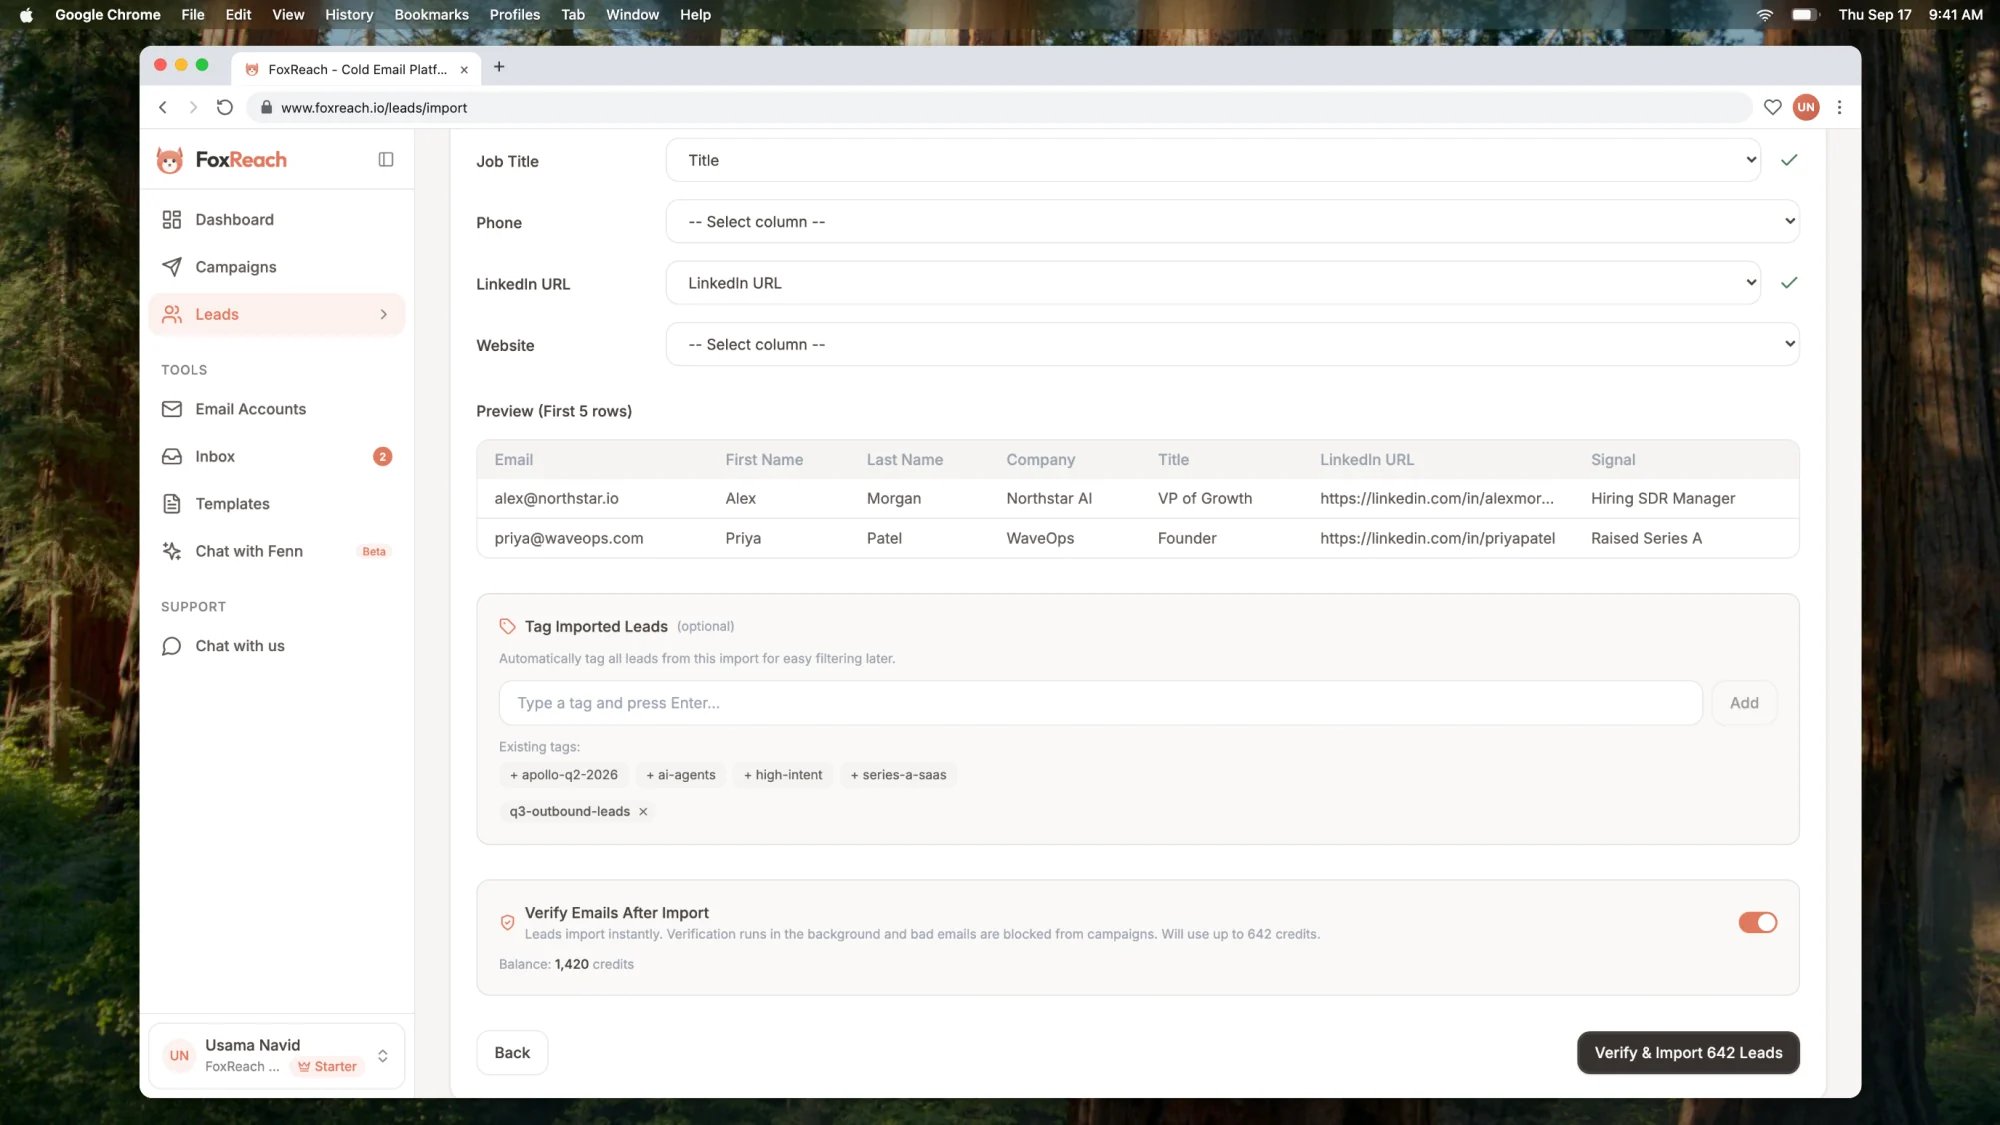
The Import Leads wizard on the Map Fields stage with the Verify Emails After Import switch turned on
Step 5: Let campaigns skip the bad ones
Nothing extra to configure here. Once a lead is marked Bad, FoxReach keeps it out of every campaign it belongs to:- When a campaign schedules its next batch of sends, leads with a Bad status are left out.
- If a lead was already queued and then verified as Bad, a final check before each send cancels that email.
- If you try to send a manual email from a Bad lead’s page, FoxReach refuses with the message “This lead’s address failed verification and can no longer be emailed.”
What the statuses mean
The distinction that matters most is Unverifiable versus Bad. A catch-all domain accepts delivery for any local part, so the probe that asks “does this mailbox exist” gets a yes for every address, including made-up ones. In SMTP terms, the server never answers the RCPT command with the 550 “mailbox unavailable” reply defined in RFC 5321, so there is nothing to learn from it. Many corporate domains on hosted mail also refuse probes outright, which lands in the same bucket. FoxReach reports what it can prove and leaves the decision to you.
Credits and plans
Every check costs one verification credit, charged per address. Checks that come back as Error are not charged. Each paid subscription plan, Starter, Growth, and Agency, includes 1,000 verification credits per month. On the lifetime deal, the Solo tier includes 750 a month and every higher tier includes 1,000. The Free plan does not include verification, which is why the verification controls do not appear on free workspaces. Full plan details are on the pricing page. Credits expire 30 days after they land, so a month’s grant lapses before the next one arrives. They do not roll over. To see your balance, open Settings from the menu at the bottom of the sidebar and go to the Billing tab. The Verification Credits card shows the current balance and, under it, the earliest expiry date with a countdown in days. The same balance appears next to the checkbox on the Add Lead form and under the switch in the import wizard. To buy more, use the Purchase Credits box on that same card. Enter a number of packs from 1 to 100, where each pack is 1,000 verifications at $1 per 1K, and click Purchase Credits. Checkout opens in Stripe and the credits land as soon as payment completes, with their own 30-day expiry. Only the workspace owner or an admin can buy credits.Troubleshooting
“Insufficient verification credits” when you click Verify. The toast includes a Buy credits button that takes you to the Billing tab. Alternatively, select fewer leads; the bulk action needs one credit per selected lead before it starts. Most of a clean list came back Unverifiable. Normal for B2B lists. Catch-all domains and probe-refusing corporate mail servers both land in this bucket, and neither means the address is fake. Send to them, watch the campaign’s bounce rate, and let bounces mark the real dead ends. A lead is stuck on Pending. Pending means the lead is waiting for a background job, usually from an import, and large files are checked one address at a time. If the import finished long ago and the clock is still there, select the lead on the Leads page and click Verify to check it directly. A Good address still bounced. Verification is a snapshot. Mailboxes get closed, domains change hands, and a server can reject a message for volume or content reasons unrelated to whether the address exists. FoxReach marks the lead as bounced and stops sending to it. Re-verify old lists before reusing them. The Verify action or the import switch is missing. The workspace is on the Free plan. Upgrade from the Billing tab and the controls appear.Next step
With a verified list, the next move is to put it to work. Create a cold email campaign in FoxReach walks through building the sequence and choosing which leads go in, and email warmup in FoxReach covers protecting the inboxes you send from, which is the other half of keeping bounces from hurting you. Still setting up? The getting started guide covers connecting an inbox and importing leads, and the import leads tutorial goes deeper on column mapping. For the wider picture, read the cold email deliverability guide and check your domain’s standing in Google Postmaster Tools.Frequently asked questions
How do I verify emails in FoxReach?
How do I verify emails in FoxReach?
There are three places. Tick Verify email before adding on the Add Lead form to check a single address as you create it. Select leads on the Leads page and click Verify in the toolbar to check up to 200 at once. Or switch on Verify Emails After Import in the CSV import wizard to check a whole file in the background.
What does Unverifiable mean on a lead?
What does Unverifiable mean on a lead?
Unverifiable means the check could not reach a yes or no answer. The usual reason is a catch-all domain that accepts mail for any address, so the probe cannot tell whether the mailbox exists. Hover the amber icon on the Leads page to see the reason. FoxReach still sends to Unverifiable leads; only Bad leads are skipped.
Does FoxReach skip bad emails automatically?
Does FoxReach skip bad emails automatically?
Yes. Any lead whose verification status is Bad is left out when a campaign schedules its next batch, and a final check before each send cancels the email if the lead was marked Bad after it was queued. Manual sends from the lead page are blocked too. Leads that are unverified, pending, or unverifiable still receive emails as normal.
How many verification credits do I get?
How many verification credits do I get?
Every paid subscription plan, Starter, Growth, and Agency, includes 1,000 verification credits each month, and one credit covers one check. Credits expire 30 days after they land, so they do not roll over. If you need more, buy extra packs of 1,000 from the Verification Credits card on the Billing tab in Settings. The Free plan does not include verification.
Why did a Good email still bounce?
Why did a Good email still bounce?
Verification is a snapshot of the mailbox at the moment of the check. A mailbox can be closed, a domain can change hands, or a server can reject mail for reasons unrelated to whether the address exists, such as volume limits or content filtering. Keep verifying close to send time, watch bounce rate per campaign, and treat any bounced lead as unsendable.